

Standing in front of a wall of dials and digital displays, wondering which weather station actually makes sense for someone who has never owned one, is exactly where most beginners get stuck. You want to track temperature, rainfall, or pressure changes without needing an engineering degree to read the thing. A good weather station for beginners should be simple to set up, easy to read at a glance, and reliable enough that you actually use it every day.
The short answer is that you don't need the most expensive or feature-packed unit on the market. What matters is matching the key features to how you'll actually use it, whether that's a simple wireless indoor-outdoor thermometer or a wooden weather station with a barometer for tracking pressure trends.
In this guide, we'll walk through what to look for before you buy, compare ready-made options against basic DIY setups, and point out where brands like TFA Germany get the balance right for newcomers. By the end, you'll know exactly which type suits your home and your budget.
What to consider before buying your first weather station
Most people buying their first weather station fall into one of two traps. Either they grab the cheapest indoor-outdoor thermometer at the hardware store and outgrow it in a month, or they read a few enthusiast forums and end up eyeing a $600 station with soil moisture sensors they'll never use. Neither extreme serves a beginner well. Before you open your wallet, work through a few practical questions about how you'll actually use the thing day to day.
Start with your actual habits, not the spec sheet
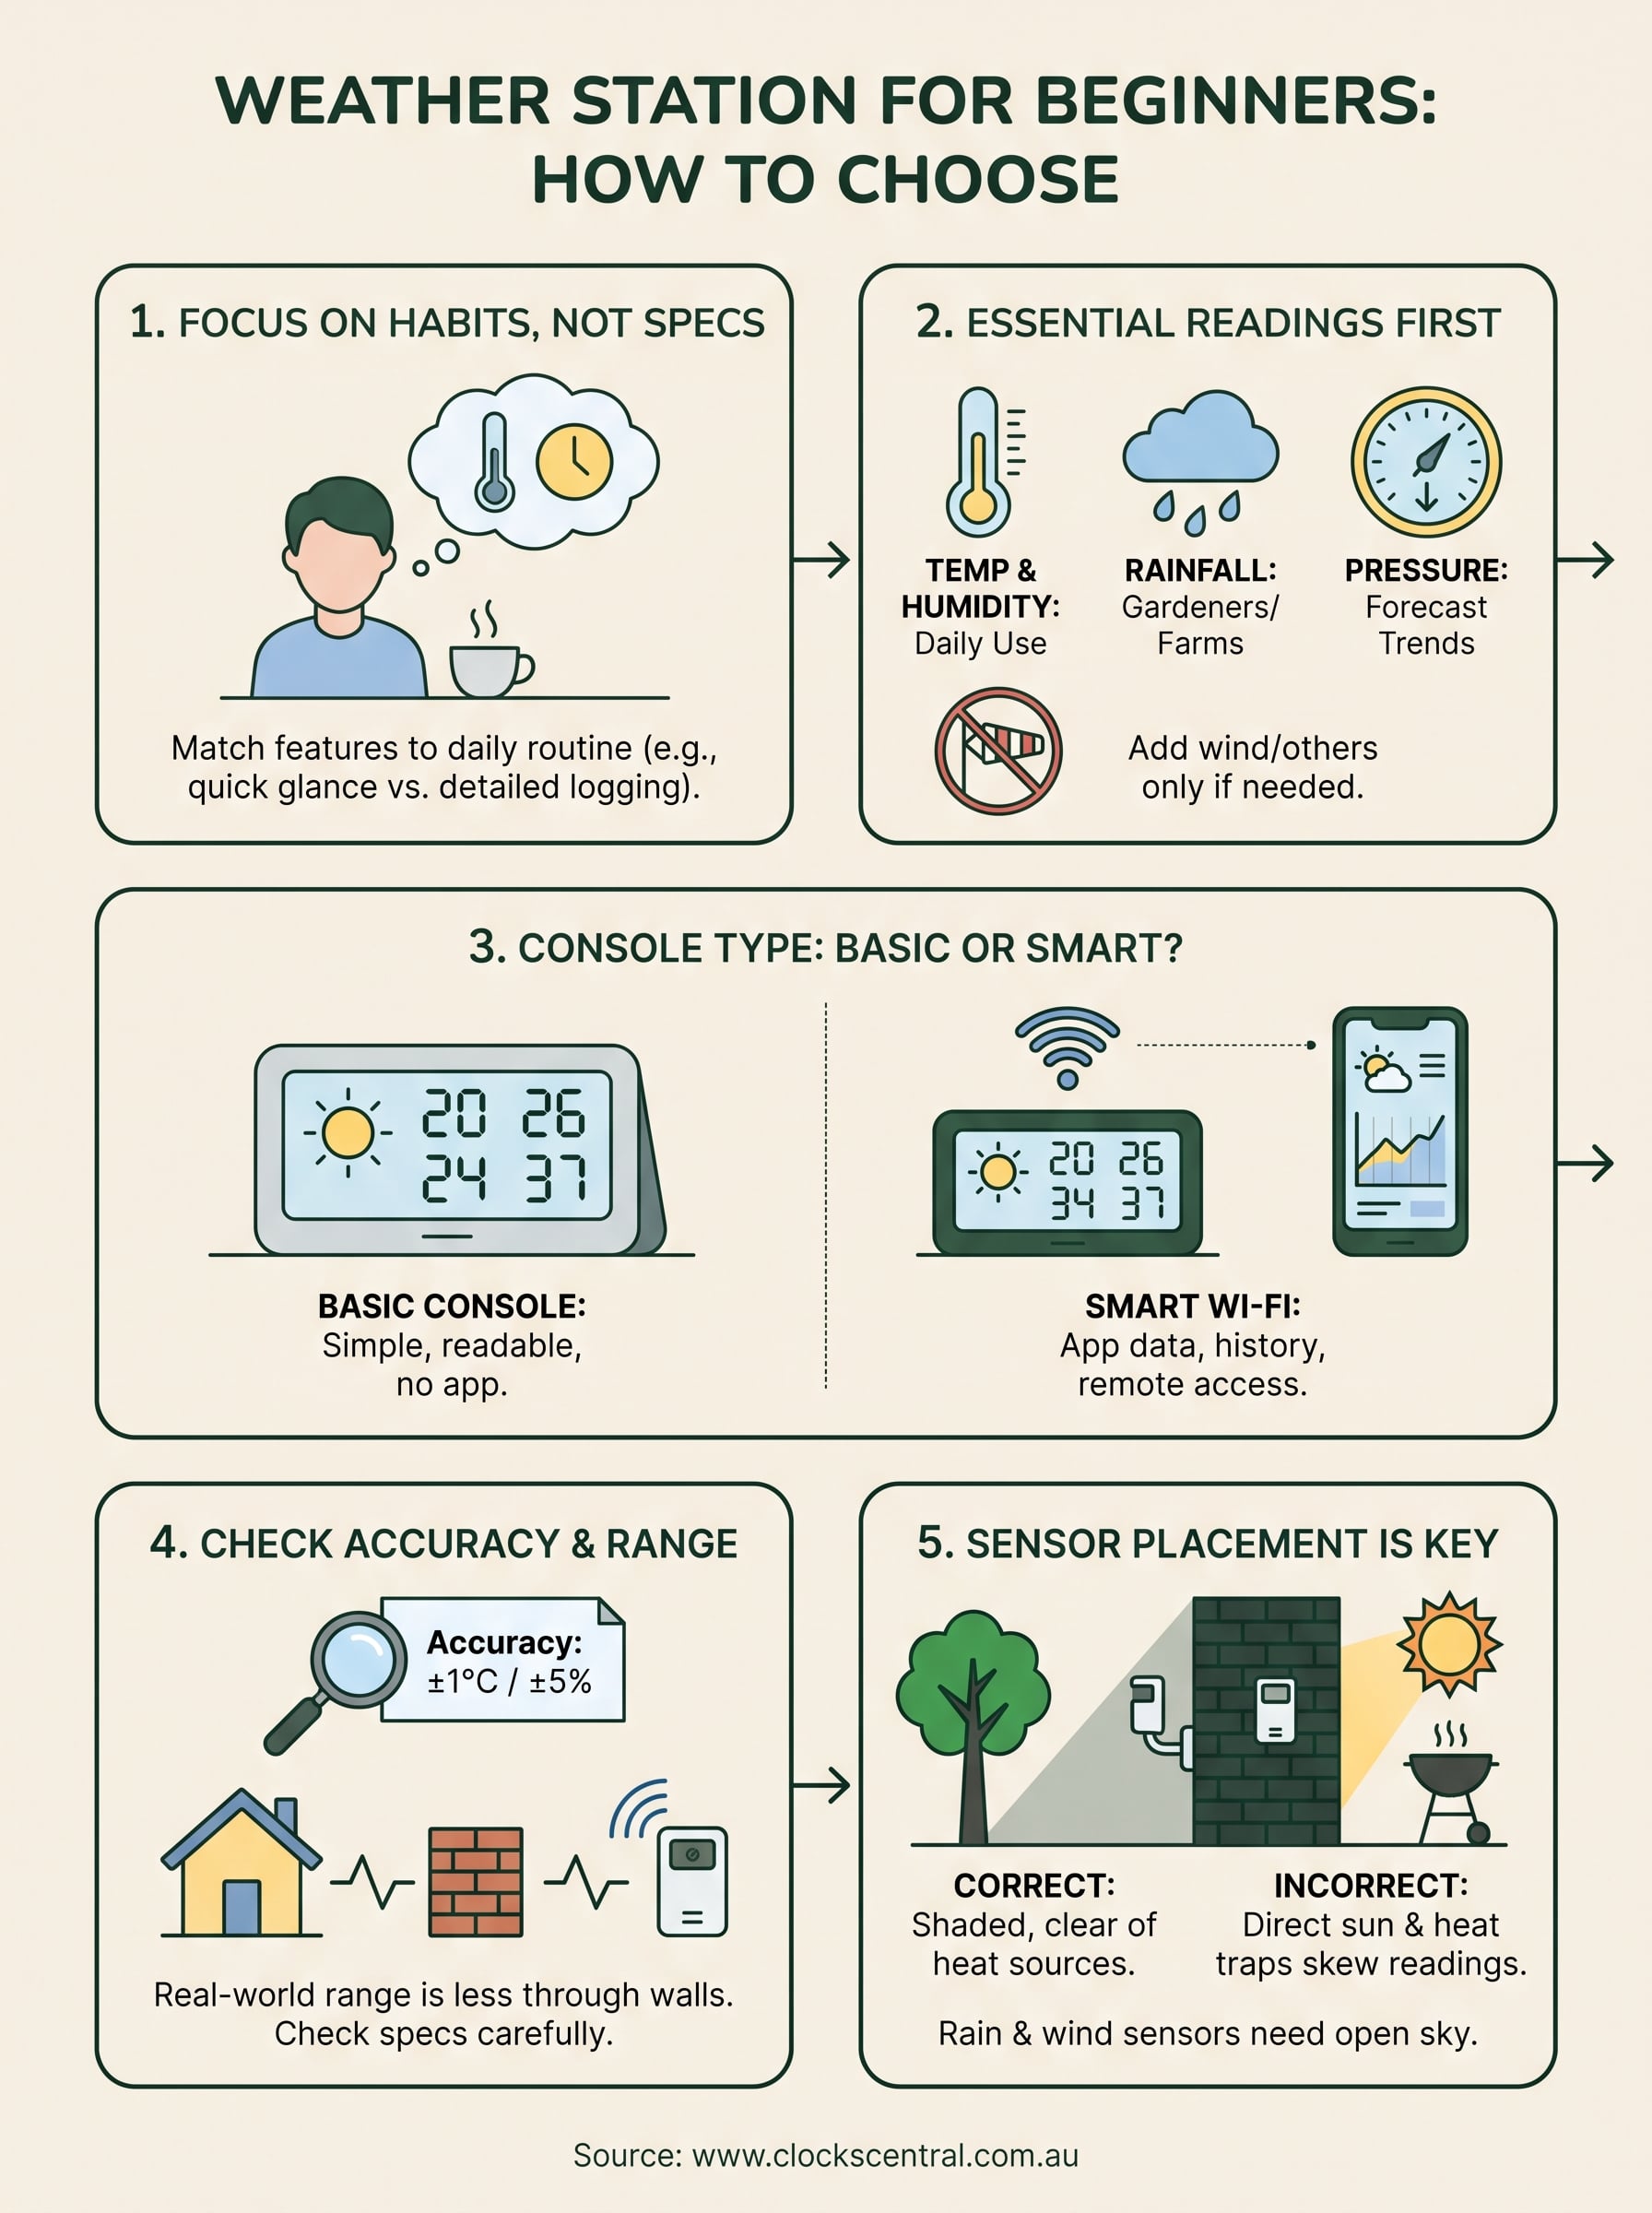
Think about what you check right now. Do you glance at your phone weather app before leaving the house, or do you want a display sitting on the kitchen bench that tells you at 6am whether to grab a jacket? Daily habits matter more than technical specifications when you're new to this. A retiree who potters in the garden every morning wants outdoor temperature and rainfall on a console they can read without their glasses. A parent packing school lunches wants a quick glance at humidity and whether it'll rain by 3pm. Write down the two or three readings you'd actually use, because that list will save you from paying for features that sound impressive but sit ignored.
Buy for the readings you'll check every morning, not the ones that look good on a spec sheet.
Set a realistic budget
Weather stations sold in Australia span a wide price range, and the jump in usefulness between tiers isn't always linear. A basic budget of $50 to $80 gets you a solid indoor-outdoor thermometer with humidity, which covers most beginners fine. Once you're past $150, you're paying for wireless range, multiple sensor channels, and often a barometer for pressure trends.
| Price range (AUD) | What you typically get | Best suited to |
|---|---|---|
| $30-$60 | Basic indoor/outdoor temp and humidity | Renters, first-timers, single room tracking |
| $80-$150 | Added barometer, multiple sensors, larger display | Gardeners, hobbyists wanting pressure trends |
| $180-$350 | Wi-Fi connectivity, app integration, rain and wind sensors | Enthusiasts wanting full home coverage |
| $400+ | Professional-grade sensors, expandable ecosystems | Serious hobbyists, small-scale weather tracking |
Brands like TFA Germany sit comfortably in that $80 to $250 band, which is exactly where most beginners find the right mix of reliability and features without paying for functions they'll never touch.
Think about where it will live
Your living situation shapes the decision just as much as budget. Apartment dwellers with a balcony need a compact outdoor sensor with decent wireless range through walls, since the console usually sits well inside the home. Homeowners with a backyard have more flexibility with sensor placement but need to think about how far the signal has to travel and whether nearby structures will block it. If you're in a share house or rental, look for stations that mount easily without drilling, since a simple bracket or adhesive mount beats a permanent fixture you can't take with you.
Finally, consider whether you want a single unit doing everything or separate, purpose-built pieces. A wooden weather station with an analogue barometer, thermometer, and hygrometer looks lovely on a study wall and needs zero setup beyond hanging it, while a digital wireless system takes a bit more fiddling but gives you live outdoor readings without leaving the room. Neither choice is wrong, but knowing which one matches your patience for setup will steer you toward the right category before you even start comparing individual models.
Step 1. Work out which weather readings you actually need
Before you compare a single model, sit down and list the readings you'd genuinely use, not the ones that sound clever in a product description. Most beginners only need three or four core measurements, and piling on extras like UV index or soil moisture just adds cost and complexity you'll never touch. The trick is matching essential readings to your actual routine rather than chasing a spec sheet that promises everything.
Rank your must-haves
Start with temperature and humidity, since almost every buyer checks these daily and nearly every station handles them well. From there, decide whether rainfall, wind speed, or barometric pressure actually matter to you, because each one adds a sensor, a bit more setup, and usually a jump in price.
- Temperature (indoor and outdoor): the baseline reading, useful for everyone, dress-for-the-day decisions and checking if the kids' room is too warm overnight.
- Humidity: handy for spotting damp problems in bathrooms or basements, and for gardeners watching plant stress.
- Barometric pressure: worth having if you want early warning of weather changes, since a falling reading over a few hours often signals rain before the sky does.
- Rainfall: genuinely useful if you garden, farm a small block, or manage water tanks.
- Wind speed and direction: mostly relevant to boaties, kite flyers, or anyone near open coastline; skip it if you live in a suburban block surrounded by houses.
Pick the readings that change what you actually do that day, not the ones that just look impressive on a box.
Match readings to your lifestyle
Gardeners get the most value from pressure trends and rainfall totals, since both help predict watering needs and frost risk before it hits. A falling barometer reading combined with rising humidity is a fairly reliable signal that rain's coming within a few hours, which beats guessing from the sky alone.
Families juggling school runs and sport on weekends usually get more from a simple temperature and humidity combo than anything more elaborate, since the goal is a quick glance before leaving the house. If you're near the coast or manage a boat, tide clocks and wind data become genuinely practical rather than novelty extras.
Once you've settled on your must-have list, resist the urge to add "just in case" sensors. Every extra reading means another sensor to mount, another battery to replace, and another line of data cluttering a display you're trying to read in five seconds each morning. Keep the list short, and let it guide every decision from here, including whether you need a basic console or something with app connectivity.
Step 2. Choose a basic console or a smart Wi-Fi station
Once you know which readings matter, the next decision is whether you want a standalone console or a Wi-Fi connected station that pushes data to your phone. This is where most beginners get overwhelmed, because marketing copy makes the smart option sound essential when a simple console often does the job just as well. A genuine weather station for beginners doesn't need an app to be useful; it needs to be readable and reliable.
A basic console suits most people starting out
Standard consoles display readings on a screen that sits on your bench or shelf, updating every few minutes from an outdoor sensor. Setup usually means pairing the sensor once, popping in batteries, and you're done, no accounts, no software updates, no dependence on your home Wi-Fi staying up. These units, including many TFA Germany models, are built for exactly this: someone who wants accurate readings without learning a new app.
If you'd be happy checking a screen on the kitchen bench, skip the app and save the money for a better sensor.
Smart stations trade simplicity for extra data
Wi-Fi stations sync your readings to an app, store history, and often let you check conditions from work or while travelling. That's genuinely handy if you like graphing pressure trends over weeks or comparing this month's rainfall to last year's. The trade-off is a slightly fiddlier setup, occasional firmware updates, and a reliance on your home network staying stable, which matters if you live somewhere with patchy internet.
| Feature | Basic console | Smart Wi-Fi station |
|---|---|---|
| Setup time | 5-10 minutes | 15-30 minutes |
| Ongoing maintenance | Battery changes only | Firmware updates, app logins |
| Data history | Limited or none | Weeks to years, stored in app |
| Remote access | No | Yes, via smartphone |
| Typical price (AUD) | $30-$120 | $150-$350+ |
Ultimately, ask yourself whether you'll actually open an app daily or just want a number to glance at while making coffee. Plenty of buyers assume they'll love the data logging, then never open the app past the first week. If that sounds like you, a well-made basic console will serve you better and cost less than a smart station gathering dust in a drawer of forgotten passwords.
Step 3. Check accuracy, range and expansion options
Once you've settled on console versus Wi-Fi, dig into the numbers that actually determine whether a station works reliably in your home. Accuracy specs and wireless range get buried in fine print, but they matter more than any headline feature, because a beautiful display showing wrong numbers is worse than no display at all.
Read the accuracy specs properly
Manufacturers list accuracy as a plus-or-minus figure, and it's worth checking before you buy rather than after you're annoyed by readings that don't match your gut feel. Temperature sensors on decent beginner stations typically read within ±1°C, while humidity sensors often carry a wider ±5% margin because moisture is genuinely harder to measure precisely. Barometric pressure sensors are usually the most accurate component on any station, since air pressure changes are easier to detect electronically than temperature swings caused by sunlight hitting a sensor.
A station that's accurate to within one degree beats one packed with features but wrong by three.
Cheap unbranded stations sometimes skip publishing accuracy figures altogether, which is itself a warning sign. Established brands like TFA Germany list these specs clearly on the box or product page, and that transparency is a decent proxy for overall build quality even before you check a single review.
Match wireless range to your actual property
Advertised wireless range on the box assumes open, flat ground with nothing in between, which almost nobody actually has. Brick walls, metal roofing, and even thick foliage can cut real-world range by 30 to 50%, so a station advertised at 100 metres might struggle past 50 metres through a Colorbond fence and a double-brick wall.

| Advertised range | Realistic range through walls/obstacles |
|---|---|
| 30m | 15-20m |
| 60m | 30-40m |
| 100m | 50-70m |
| 150m+ | 80-100m |
Measure the actual distance from where you'll mount the outdoor sensor to where the console will sit, including any walls or structures in between, before you commit to a model. If you're borderline, buy a station rated for double the distance you need rather than exactly matching it.
Check whether you can add sensors later
Finally, look at expansion options, since your needs might grow even if you're starting simple. Many mid-range stations support two, three, or even eight extra sensor channels, letting you add a second outdoor sensor for the shed or a soil probe for the garden down the track. Buying a station with a couple of spare channels costs little extra now and saves you replacing the whole unit later if your interest in tracking weather grows beyond the basics.
Step 4. Position your sensors for reliable readings
Even the most accurate station will lie to you if the sensor sits in the wrong spot. Sensor placement is the single biggest factor in whether your readings actually reflect the weather outside, rather than the heat bouncing off your brick wall or the shade under your patio roof. Get this step wrong and you'll spend months wondering why your "outdoor" temperature reads five degrees hotter than the news forecast.
Keep the outdoor sensor away from heat traps
Mount your temperature and humidity sensor somewhere shaded, ideally on a north or south-facing wall away from direct afternoon sun, and at least a metre clear of any surface that radiates heat, like brick, concrete, or a dark fence. Avoid mounting it near air conditioning units, dryer vents, or barbecues, since even brief bursts of warm air will throw off readings for hours. A spot under eaves or a tree canopy works well, giving shade without blocking airflow.

A sensor baking in full sun will always lie to you, no matter how expensive the console.
Give rain and wind sensors clear sky
Rain gauges need open sky above them, so mount them well clear of overhanging roofs, trees, or pergolas that could catch rain before it reaches the collector. Wind sensors are fussier again, ideally sitting higher than surrounding fences and structures, since turbulence from nearby walls skews both speed and direction readings. If you live in a standard suburban block, accept that your wind readings will be an estimate rather than a precise figure, and treat them accordingly.
| Sensor type | Ideal spot | Common mistake |
|---|---|---|
| Temperature/humidity | Shaded wall, away from heat sources | Mounted on dark brick in full sun |
| Rain gauge | Open sky, clear of overhangs | Placed under eaves or tree cover |
| Wind sensor | Highest clear point available | Blocked by fences or nearby roofs |
| Barometer | Indoors, anywhere stable | Rarely gets placement wrong |
Barometers care less about location
Unlike temperature and rain sensors, barometric pressure sensors usually sit inside the console itself, since air pressure is essentially the same across a suburban block regardless of exact position. That means you don't need to fuss over placement here, just make sure the console isn't sealed in an airtight cabinet where pressure changes lag behind the outside world. Once your sensors are mounted sensibly, you're ready to move on to getting the display and app talking to each other properly.
Step 5. Set up your display, app and calibration
Getting the hardware mounted is only half the job. A weather station for beginners still needs its display or app configured correctly, or you'll end up staring at numbers that look plausible but drift further from reality every week. Most of this takes fifteen minutes once, and it's the difference between a station you trust and one you second-guess every time it disagrees with the news.
Pair the console before you mount anything
Before fixing your outdoor sensor to a wall, pair it with the console indoors first, in the same room, so you know the connection works. Check the display shows live readings updating every few minutes, then walk the sensor out to its final position and confirm the signal still holds. Doing this test run saves you climbing a ladder twice if the pairing fails or the range falls short.
Follow a simple setup order
- Install batteries in the console and outdoor sensor at the same time, since mismatched battery levels cause dropouts.
- Pair the sensor using the button combination in the manual, usually holding both units' pairing buttons for a few seconds.
- Set the clock, date, and units (Celsius, hPa, km/h) before mounting anything permanently.
- If it's a Wi-Fi model, download the manufacturer's app and connect the console to your home network using the QR code or manual entry.
- Confirm live data appears in the app, then mount the outdoor sensor in its final spot.
Calibrate against a known reference
Once everything's running, check your readings against a reliable local source, such as the closest station listed on the Bureau of Meteorology website, and adjust the offset in your settings menu if there's a consistent gap. Most consoles let you nudge temperature and humidity by a fixed amount, which fixes small manufacturing variances without needing a new sensor.
Calibrate once against a trusted local reading, and you'll trust every number after that.
Apps typically store history automatically, so spend a minute checking that data logging is switched on if you want to look back over trends later. Skipping calibration is the most common reason beginners abandon their station within a month, convinced it's inaccurate when it just needed a small manual adjustment.
Step 6. Try a simple DIY station if you enjoy tinkering
If you like building things or want to understand exactly how your readings are generated, a DIY weather station can be a satisfying weekend project rather than a chore. You won't get the polish of a boxed unit straight out of the packet, but you'll learn far more about how temperature, humidity, and pressure sensors actually behave, and you can expand the setup piece by piece as your interest grows. This route suits tinkerers more than anyone chasing the quickest path to a working display.
Start with a basic build
A simple first project pairs an analogue thermometer, hygrometer, and barometer in a single housing, similar in spirit to a wooden weather station, but assembled by you rather than bought pre-fitted. Mount the three instruments in a small timber box or repurposed picture frame, hang it somewhere stable indoors, and you've got a functioning, calibrated set of instruments without a single battery or app involved. It won't log data automatically, but it teaches you to read pressure trends and humidity shifts the old-fashioned way, which builds genuine understanding before you move to anything electronic.
Building your own setup teaches you more about weather instruments than any app ever will.
Add electronics once you're comfortable
For a more involved project, a Raspberry Pi or Arduino paired with cheap temperature, humidity, and pressure modules gives you full control over logging and display. Plenty of beginners follow published guides for basic sensor wiring and simple data logging scripts, and the parts typically cost less than a mid-range consumer console.
Rough DIY starter kit checklist:
- Microcontroller (Arduino Uno or Raspberry Pi Zero)
- Temperature and humidity sensor module
- Barometric pressure sensor module
- Breadboard, jumper wires, and a small enclosure
- USB power supply or battery pack
- Basic soldering kit if you're assembling permanently
Know when DIY isn't worth it
Be honest about your patience for troubleshooting, because a DIY build occasionally means chasing a loose wire or a corrupted script instead of just reading a number off a screen. If you want reliable readings from day one with no fuss, a ready-made console or Wi-Fi station remains the better call. Reserve the DIY route for when the process itself, not just the result, is part of the appeal, and treat it as a hobby project rather than your only source of weather data around the house.
Turning your readings into everyday forecasts
A weather station only earns its spot on the bench once you actually use what it tells you. Watch the pressure trend over a few hours rather than the single number, since a steady drop usually means rain is coming regardless of what the sky looks like right now. Pair that with your outdoor temperature and humidity readings and you'll start predicting your own mini-forecast before the news catches up, whether that's deciding on a jacket for the school run or timing the washing.
Start simple, get your placement and calibration right, and add sensors only once you're genuinely using the basics daily. If you're still shopping around for that first console, a wooden weather station or a straightforward TFA Germany model makes a solid, low-fuss starting point. Browse the range at Clocks Central and pick the one that matches your morning routine, not the spec sheet.
0 comments